Showing posts with label Concurrency. Show all posts

Friday, March 18, 2016

Measuing latency with HdrHistogram

I had the pleasure last year to meet with Gil Tene, an authority on building high performance software and specifically high performance JVM implementations. He gave a brilliant presentation at React San Francisco and then again at YOW in Australia on common mistakes made when measuring performance. He he explained that measuring latency is not about getting a number, but identifying behavior and characteristics of a system.

Often when we set out to measure the performance of our software we can be guided by NFR (Non-Functional Requirements) that really don't make too much sense. More than once I have been presented with a requirement that the system must  process x requests per time-period e.g 5 messages per second. However as Gil points out this single number is either unreasonable, or misleading. If the system must always operate in a state to support these targets then it may be cost prohibitive. This requirement must also define 100% up-time. To work around that, some requirements specify that the mean response time should be y. However this is potentially less useful. By definition what we are really specifying is the 50% of requests must see worse performance than the target.

A useful visualization for pointing out the folly of chasing a mean measurement is illustrated below.

File:Anscombe's quartet 3.svg
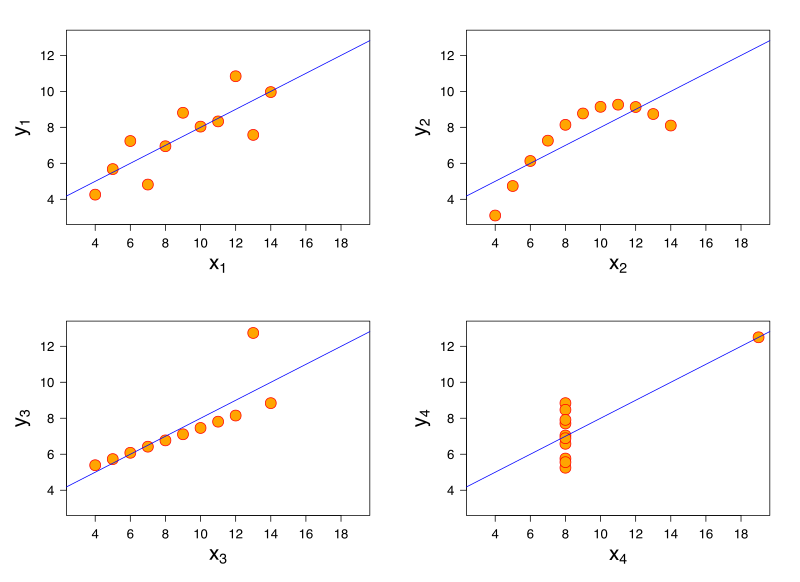
[Source - https://en.wikipedia.org/wiki/Anscombe%27s_quartet]

All of these charts have the same mean value, but clearly show different shapes of data. If you measuring latency in your application and were targeting a mean value, you may be able to hit these targets but still have unhappy customers.

When discussing single value targets, a mean value can be thought of as just the 50th percentile. In the first case the requirement was for the 100th percentile.

Perhaps what is more useful is to measure and target several values. Maybe the 99th percentile plus targets at 99.9% and 99.99% etc is what you really are looking for.

Measuring latency with histograms

Instead of capturing a count and a sum of all latency recorded to then calculate a mean latency, you can capture latency values and assign them to a bucket. The assignment of this value to a bucket is to simply increment the count of that bucket. This now allows us to analyse the spread of latency recordings.

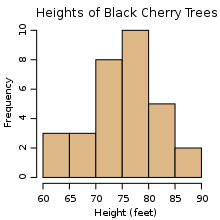
The example of a histogram from Wikipedia shows how to represent heights by grouping into buckets of 5cm ranges. For each value of the 31 Black Cheery Trees measured, the height is assigned to the bucket and the count for that bucket increased. Note that the x axis is linear.

An example histogram of the heights of 31 Black Cherry trees

A naive implementation of a histogram however, may require you to pre-plan your number and width of your buckets. Gil Tene has helped out here by creating an implementation of a histogram that specifically is design for high dynamic ranges, hence its name HdrHistogram.

When you create an instance of an HdrHistogram you simply specify
  1. a maximum value that you will support
  2. the precision you want to capture as the number of significant digits
  3. optionally, the minimum value you will support
The internal data structures of the HdrHistogram are such that you can very cheaply specify a maximum value that is an order of magnitude larger than you will expect, thus giving you enough headroom for your recorded values. As the HdrHistogram is designed to measure latency a common usage would be to measure a range from the minimum supported value for the platform (nanoseconds on JVM+Linux, or ticks on .NET+Windows) up to an hour, with a fidelity of 3 significant figures.


For example, a Histogram could be configured to track the counts of observed integer values between 0 and 36,000,000,000 while maintaining a value precision of 3 significant digits across that range. Value quantization within the range will thus be no larger than 1/1,000th (or 0.1%) of any value. This example Histogram could be used to track and analyze the counts of observed response times ranging between 1 tick (100 nanoseconds) and 1 hour in magnitude, while maintaining a value resolution of 100 nanosecond up to 100 microseconds, a resolution of 1 millisecond(or better) up to one second, and a resolution of 1 second (or better) up to 1,000 seconds. At it's maximum tracked value(1 hour), it would still maintain a resolution of 3.6 seconds (or better).

Application of the HdrHistogram

When Matt (@mattbarrett) and I presented Reactive User Interfaces, we used the elements of drama and crowd reaction to illustrate the differences between various ways of conflating fast moving data from a server into a client GUI application. To best illustrate the problems of flooding a client with too much data in a server-push system, we used a modestly powered Intel i3 laptop. This worked fairly well in showing the client application coming to its knees when overloaded. However it also occasionally showed Windows coming to its knees too, which was a wee bit too much drama to have on stage during a live presentation.

Instead we thought it better to provide a static visualization of what was happening in our system when it was overloaded with data from the server. We could then contrast that with alternative implementations showing how we can perform load-shedding on the client. This also meant we could present with a single high powered laptop, instead of bringing the toy i3 along with us just to demo.

We added a port of the original Java HdrHistogram to our .NET code base. We used it to capture the latency of prices from the server, to the client, and then the additional latency for the client to actually dispatch the rendering of the price. As GUI applications are single threaded, if you provided more updates than the GUI can render, there are two things that can happen:

  • updates are queued
  • updates are conflated
What you do in your client application depends on your requirements. Some systems will need to process every message. In this case they may choose to just allow the updates to be queued. Other systems may allow updates to be conflated. Conflation is the act of taking many and reducing to one. So for some systems, they maybe able to conflate many updates and average them or aggregate them. For other systems, it may only be the last message that is the most important, so the conflation algorithm here would be to only process the last message. Matt discusses this in more detail on the Adaptive Blog.

In the demo for ReactiveTrader we demo queuing all updates and 3 styles of conflation. When we applied the HdrHistogram to our code base, we were quick to see we actually had a bug in our code base.


We had two problems. The first problem was an assumption that what worked for Silverlight, would also work for WPF. As WPF has two threads dedicated to presentation (a UI thread and a dedicated Render thread), we were actually only measuring how long it took for us to put a price on another queue! You can see that the ObserveLatest1 and ObserverLatest2 (red and yellow) lines show worse performance than just processing all items on the dispatcher. I believe this is due to us just doing more work to conflate before sending to the render thread. Unlike in Silverlight, once we send something to the Render thread in WPF we can no longer measure the time taking to actually render the change. So our measurements here were not really telling us the full story.

The second problem we see is that there was actually a bug in the code we copied from our original silverlight (Rx v1) code. The original code (red line) accidentally used a MultipleAssignmentDisposable instead of a SerialDisposable. The simple change gave us the improvements seen in the yellow line.

We were happy to see that the Conflate and ConstantRate algorithms were measuring great results, which were clearly supported visually when using the application.


To find out more about the brilliant Gil Tene
I am currently working on the final details of a complete port of the original Java HdrHsitogram to .NET. You can see my work here - https://github.com/LeeCampbell/HdrHistogram.NET

Wednesday, May 25, 2011

Rx code from Perth Presentation

Sorry about the delay in getting this code up. For those who could not make it, my part of the presentation did a bit of an intro and then discussed the testability of Rx and the easy way to deal with streaming data such as pricing in a financial industry.

RxSamplesGalleryScreenShot

RxSamplesTWAPChartScreenShot

The key samples from my half of the presentation that raised some interest was the testability of the Photo Gallery View model. The Gallery ViewModel was effectively this

/// <summary>
/// Tested Rx implementation of the ViewModel
/// </summary>
public sealed class RxPhotoGalleryViewModel : INotifyPropertyChanged
{
    public RxPhotoGalleryViewModel(IImageService imageService, ISchedulerProvider scheduler)
    {
        IsLoading = true;
        var files = imageService.EnumerateImages()
                                .ToObservable();

        files
            .SubscribeOn(scheduler.ThreadPool)
            .ObserveOn(scheduler.Dispatcher)
            .Subscribe(
                imagePath =>
                {
                    Images.Add(imagePath);
                },
                () =>
                {
                    IsLoading = false;
                });
    }

    private readonly ObservableCollection<string> _images = new ObservableCollection<string>();
    public ObservableCollection<string> Images
    {
        get { return _images; }
    }

    private bool _isLoading;
    public bool IsLoading
    {
        get { return _isLoading; }
        set
        {
            if (_isLoading != value)
            {
                _isLoading = value;
                InvokePropertyChanged("IsLoading");
            }
        }
    }

    #region Implementation of INotifyPropertyChanged

    public event PropertyChangedEventHandler PropertyChanged;

    public void InvokePropertyChanged(string propertyName)
    {
        PropertyChangedEventHandler handler = PropertyChanged;
        if (handler != null) handler(this, new PropertyChangedEventArgs(propertyName));
    }

    #endregion
}

Except from the constructor, there is really just two properties that expose change notification for the WPF binding engine. Now the code in the constructor is demo-quality in the sense that it is not good practice to do so much work in the constructor. Maybe this would be better

public sealed class RxPhotoGalleryViewModel
{
    private readonly IImageService _imageService;
    private readonly ISchedulerProvider _scheduler;

    public RxPhotoGalleryViewModel(IImageService imageService, ISchedulerProvider scheduler)
    {
        _imageService = imageService;
        _scheduler = scheduler;
    }

    public void Start()
    {
        IsLoading = true;
        var files = _imageService.EnumerateImages()
                                .ToObservable();

        files
            .SubscribeOn(_scheduler.ThreadPool)
            .ObserveOn(_scheduler.Dispatcher)
            .Subscribe(
                imagePath => Images.Add(imagePath),
                () =>IsLoading = false);
    }
//....
}

The test fixture is fairly simple. We pass in a mock implementation of the IImageService and the TestSchedulerProvider similar to the one shown in Rx Part 8 – Testing Rx.

[TestClass]
public class RxPhotoGalleryViewModelTests
{
    private Mock<IImageService> _imageSrvMock;
    private TestSchedulderProvider _testSchedulderProvider;
    private List<string> _expectedImages;

    [TestInitialize]
    public void SetUp()
    {
        _imageSrvMock = new Mock<IImageService>();
        _testSchedulderProvider = new TestSchedulderProvider();

        _expectedImages = new List<string> { "one.jpg", "two.jpg", "three.jpg" };
        _imageSrvMock.Setup(svc => svc.EnumerateImages())
                        .Returns(_expectedImages);

    }

    [TestMethod]
    public void Should_add_ImagesServiceResults_to_Images()
    {
        //Arrange
        // done in setup

        //Act
        var sut = new RxPhotoGalleryViewModel(_imageSrvMock.Object, _testSchedulderProvider);
        _testSchedulderProvider.ThreadPool.Run();
        _testSchedulderProvider.Dispatcher.Run();

        //Assert
        CollectionAssert.AreEqual(_expectedImages, sut.Images);
    }

    [TestMethod]
    public void Should_set_IsLoading_to_true()
    {
        //Arrange
        // done in setup

        //Act
        var sut = new RxPhotoGalleryViewModel(_imageSrvMock.Object, _testSchedulderProvider);
            
        //--NOTE-- note the missing TestScheduler.Run() calls. This will stop any observable being processed. Cool.

        //Assert
        Assert.IsTrue(sut.IsLoading);
    }

    [TestMethod]
    public void Should_set_IsLoading_to_false_when_completed_loading()
    {
        //Arrange
        // done in setup

        //Act
        var sut = new RxPhotoGalleryViewModel(_imageSrvMock.Object, _testSchedulderProvider);
        _testSchedulderProvider.ThreadPool.Run();
        _testSchedulderProvider.Dispatcher.Run();

        //Assert
        Assert.IsFalse(sut.IsLoading);
    }
}

As we now control the scheduling/concurrency we don't have to try to do anything fancy with Dispatchers,  BackgroundWorkers, ThreadPools or Tasks which are very difficult to perform unit testing on. Check out the pain that I went through to test responsive WPF apps in this post on Testing Responsive WPF complete with DispatcherFrame and Thread.Sleep(300) in my tests Sad smile

If you want the running code you can either pull the code down via SVN by following this http://code.google.com/p/rx-samples/source/checkout or you can download the zip.

The PowerPoint presentation is here

You may also be interested in the Design Guidelines produced by the Rx team at Microsoft and also where to get the latest version of Rx

Back to the contents page for Reactive Extensions for .NET Introduction

Tuesday, November 2, 2010

Rx design guidelines

The Rx team have released a pdf specifiying their Design Guidelines to use when coding with the Reactive Extentions. The original post is here http://blogs.msdn.com/b/rxteam/archive/2010/10/28/rx-design-guidelines.aspx The PDF is here http://go.microsoft.com/fwlink/?LinkID=205219 Great stuff. Next; the FxCop rules for static analysis?

More guidance at IntroToRx.com in the Usage Guidelines appendix

Tuesday, October 26, 2010

Rx Part 8 - Testing Rx

STOP THE PRESS! This series has now been superseded by the online book www.IntroToRx.com. The new site/book offers far better explanations, samples and depth of content. I hope you enjoy!

Having reviewed the scheduling available to us in Rx and now that we are aware of Hot and Cold observables we have almost enough skills in our tool belt to start using Rx in anger. However many developers wouldn’t dream of starting coding without first being able to write tests to prove their code is in fact satisfying their requirements and providing them with that safety net against regression. Rx poses some interesting problems to our Test Driven community
  • Scheduling and therefore Threading are generally avoided in test scenarios as they can introduce race conditions which may lead to non-deterministic tests.
  • Tests should run as fast as possible.
  • Rx is a new technology/library so naturally as we master it, we will refactor our code. We want to use to tests to ensure our refactoring have not altered the internal behaviour of our code base.
So we want to test our code but don't want to introduce false-negatives, false-positives or non-deterministic tests. Also if we look at the Rx library there are plenty of methods that involve Scheduling so it is hard to ignore. This Linq query shows us that there are at least 32 extension methods that accept an IScheduler as a parameter
var query = from method in typeof (Observable).GetMethods()
        from parameter in method.GetParameters()
        where typeof (IScheduler).IsAssignableFrom(parameter.ParameterType)
        group method by method.Name into m
        orderby m.Key
        select m.Key;
            
query.Run(Console.WriteLine);
/* 
BufferWithTime, Catch, Concat, Delay, Empty, Generate, GenerateWithTime, Interval
Merge, ObserveOn, OnErrorResumeNext, Prune, Publish, Range, Repeat, Replay
Retry, Return, Sample, Start, StartWith, Subscribe, SubscribeOn, Take, Throttle
Throw, TimeInterval, Timeout, Timer, Timestamp, ToAsync, ToObservable
*/
There are some methods that we already will be familiar with such as ObserveOn and SubscribeOn. Then there are others that will optionally take an IScheduler in one of the method overloads. TDD/TestFirst coders will want to opt for the overload that takes the IScheduler so that we can have some control over scheduling in our tests.
In this example we create a stream that publishes values every second for 5 seconds.
var interval = Observable
    .Interval(TimeSpan.FromSeconds(1))
    .Take(5);
If we to write a test that ensured that we received 5 values and they were each 1 second apart it would take 5 seconds. That would be no good, I want hundreds if not thousands of tests to run in 5 seconds. A more common time related example that would need tests is setting a timeout.
var stream = Observable.Never<int>();

var exceptionThrown = false;
stream.Timeout(TimeSpan.FromMinutes(1))
    .Run(
        i => Console.WriteLine("This will never run."),
        ex => exceptionThrown = true);
Assert.IsTrue(exceptionThrown);
This test would take 1 minute to run. However if we did some test first code in this style, where we added the timeout after the test, running the test initially to fail (Red-Green-Refactor) would never complete. Hmmmm…..

TestScheduler

To our rescue comes the TestScheduler. This is a recent addition to the Rx library that takes the concept of a virtual scheduler to allow us emulate and control time. Cool.
The concept of a virtual scheduler can sort of be thought of a queue of actions to be executed that are each marked with the point in time they should be executed. Where actions are attempted to be scheduled at the same “time” the second collision will be scheduled or queued after the first action but marked as with the same point in “time” . When we use the TestScheduler we can either “drain the queue” by calling run which will execute all scheduled actions, or we can specify to run all tasks up to a point in time.
In this example we schedule a task on to the queue to be run immediately by using the simple overload. We then execute everything scheduled for the first tick (ie the first action).
var scheduler = new TestScheduler();
var wasExecuted = false;
scheduler.Schedule(() => wasExecuted = true);
Assert.IsFalse(wasExecuted);
scheduler.RunTo(1);         //execute 1 tick of queued actions
Assert.IsTrue(wasExecuted);
The TestScheduler type is actually an implementation of the abstract VirtualScheduler<TAbsolute, TRelative> where the TestSchuduler specifies long for both TAbsolute and TRelative. The net result is that the TestScheduler interface looks something like this
public class TestScheduler
{
    public TestScheduler();

    // Methods
    public long FromTimeSpan(TimeSpan timeSpan);
    public long Increment(long absolute, long relative);
    public void Run();
    public void RunTo(long time);
    public IDisposable Schedule(Action action);
    public IDisposable Schedule(Action action, TimeSpan dueTime);
    public IDisposable Schedule(Action action, long dueTime);
    public void Sleep(long ticks);
    public DateTimeOffset ToDateTimeOffset(long absolute);

    // Properties
    public DateTimeOffset Now { get; }
    public long Ticks { get; }
}
We should already be familiar with what the Schedule methods would do, the other method of interest for this post are the Run() and RunTo(long) methods. Run() will just execute all the actions that have been scheduled. RunTo(long) will execute all the actions that have been scheduled up to the time specified by the long value which represents ticks in this case. Having a quick look into the implementations for Schedule, RunTo and Run give us the insight we need to really understand the virtual schedulers.
public IDisposable Schedule(Action action)
{
    return this.Schedule(action, TimeSpan.Zero);
}
public IDisposable Schedule(Action action, TimeSpan dueTime)
{
    return this.Schedule(action, this.FromTimeSpan(dueTime));
}
public IDisposable Schedule(Action action, TRelative dueTime)
{
    BooleanDisposable disposable = new BooleanDisposable();
    TAbsolute local = this.Increment(this.Ticks, dueTime);
    Action action2 = delegate {
        if (!disposable.IsDisposed)
        {
            action();
        }
    };
    ScheduledItem<TAbsolute> item = new ScheduledItem<TAbsolute>(action2, local);
    this.queue.Enqueue(item);
    return disposable;
}

public void RunTo(TAbsolute time)
{
    while ((this.queue.Count > 0) && (this.queue.Peek().DueTime.CompareTo(time) <= 0))
    {
        ScheduledItem<TAbsolute> item = this.queue.Dequeue();
        this.Ticks = item.DueTime;
        item.Action();
    }
}

public void Run()
{
    while (this.queue.Count > 0)
    {
        ScheduledItem<TAbsolute> item = this.queue.Dequeue();
        this.Ticks = item.DueTime;
        item.Action();
    }
}
Obviously this is the internal implementation and would be subject to change, however as the documentation currently is quite weak for the VirtualScheduler and TestScheduler I think this use of reflection is helpful. This example should clear up what happens when items are scheduled at the same time.
var scheduler = new TestScheduler();
long dueTime = 4L;
scheduler.Schedule(() => Console.WriteLine("1"), dueTime);
scheduler.Schedule(() => Console.WriteLine("2"), dueTime);
scheduler.Schedule(() => Console.WriteLine("3"), dueTime+1);
scheduler.Schedule(() => Console.WriteLine("4"), dueTime+1);
Console.WriteLine("RunTo(dueTime)");
scheduler.RunTo(dueTime); 
Console.WriteLine("Run()");
scheduler.Run();
/* Output:
RunTo(dueTime)
1
2
Run()
3
4
*/

Testing Rx code

Now that we have learnt a little bit about the TestScheduler, lets look at how we could use it to get our 2 initial code snippets (Interval and TimeOut) to execute as fast as possible but still maintaining the semantics of time. In this example we generate our 5 values one second apart but pass in our TestScheduler to the Interval method.
[TestMethod]
public void Testing_with_test_scheduler()
{
    var scheduler = new TestScheduler();
    var interval = Observable
        .Interval(TimeSpan.FromSeconds(1), scheduler)
        .Take(5);

    bool isComplete = false;
    interval.Subscribe(Console.WriteLine, () => isComplete = true);

    scheduler.Run();

    Assert.IsTrue(isComplete); //Executes in less than 0.01s "on my machine"
}
While this is mildly interesting, what I think is more important is how we would test a real piece of code. Imagine if you will a Presenter that subscribes to a stream of prices. As prices are published it adds them to a ViewModel. Assuming this is a WPF or Silverlight implementation we take the liberty of enforcing that the subscription be done on the ThreadPool and the observing is executed on the Dispatcher.
public class MyPresenter
{
...
    public void Show(string symbol)
    {
        _myService.PriceStream(symbol)
                                    .SubscribeOn(Scheduler.ThreadPool)
                                    .ObserveOn(Scheduler.Dispatcher)
                                    .Subscribe(price=>_viewModel.Prices.Add(price));
    }
...
}
While this snippet of code may do what we want it to do, it will be hard to test as it is accessing the schedulers via static properties. To help my testing, I have created my own interface that exposes the same IScheduler implementations that the Scheduler type does.
public interface ISchedulerService
{
    IScheduler CurrentThread { get; }
    IScheduler Dispatcher { get; }
    IScheduler Immediate { get; }
    IScheduler NewThread { get; }
    IScheduler ThreadPool { get; }
    //IScheduler TaskPool { get; }
}
public sealed class SchedulerService : ISchedulerService
{
    public IScheduler CurrentThread { get { return Scheduler.CurrentThread; } }

    public IScheduler Dispatcher { get { return Scheduler.Dispatcher; } }

    public IScheduler Immediate { get { return Scheduler.Immediate; } }

    public IScheduler NewThread { get { return Scheduler.NewThread; } }

    public IScheduler ThreadPool { get { return Scheduler.ThreadPool; } }

    //public IScheduler TaskPool { get { return Scheduler.TaskPool; } }
}
This now allows me to inject an ISchedulerService which gives me a seam to help my testing. I can now write some tests for my Presenter.
[TestInitialize]
public void SetUp()
{
    _myServiceMock = new Mock<IMyService>();
    _viewModelMock = new Mock<IViewModel>();
    _schedulerService = new TestSchedulers();

    var prices = new ObservableCollection<decimal>();
    _viewModelMock.SetupGet(vm => vm.Prices).Returns(prices);
    _viewModelMock.SetupProperty(vm => vm.IsConnected);
}

[TestMethod]
public void Should_pass_symbol_to_MyService_PriceStream()
{
    var expected = "SomeSymbol";
    var priceStream = new Subject<decimal>();
    _myServiceMock.Setup(svc => svc.PriceStream(It.Is<string>(symbol=>symbol==expected))).Returns(priceStream);

    var sut = new MyPresenter(_myServiceMock.Object, _viewModelMock.Object, _schedulerService);
    sut.Show(expected);

    _myServiceMock.Verify();
}

[TestMethod]
public void Should_add_to_VM_Prices_when_MyService_publishes_price()
{
    decimal expected = 1.23m;
    var priceStream = new Subject<decimal>();
    _myServiceMock.Setup(svc => svc.PriceStream(It.IsAny<string>())).Returns(priceStream);

    var sut = new MyPresenter(_myServiceMock.Object, _viewModelMock.Object, _schedulerService);
    sut.Show("SomeSymbol");
    _schedulerService.ThreadPool.Schedule(() => priceStream.OnNext(expected));  //Schedule the OnNext
    _schedulerService.ThreadPool.RunTo(1);  //Execute the OnNext action
    _schedulerService.Dispatcher.RunTo(1);  //Execute the OnNext Handler (ie adding to the Prices collection)

    Assert.AreEqual(1, _viewModelMock.Object.Prices.Count);
    Assert.AreEqual(expected, _viewModelMock.Object.Prices.First());
}
These two tests show first a simple expectation that a string value passed to my Show(string) method will be passed to the underlying service. This is not at all relevant to Rx. The next test shows the usage of my implementation of the ISchedulerService specific for testing. It exposes all of the IScheduler properties as instances of TestSchedulers. This now allows me to inject TestSchedulers for testing which in-turn allows me to control the rate at which things are scheduled.
For those of you new to Moq, some of the syntax my be a little bit confusing. Where you see a Setup(..) or SetupGet(..) method call there is just a little bit of Expression magic that tells my mocks to return correct thing when called. The .Object property hanging off my mocks are the dynamically generated implementations of the interfaces. This next test I hope you find the most interesting. Here we really get the full value out of our TestScheduler, by testing timeouts.
[TestMethod]
public void Should_timeout_if_no_prices_for_10_seconds()
{
    var timeoutPeriod = TimeSpan.FromSeconds(10);
    var priceStream = Observable.Never<decimal>();
    _myServiceMock.Setup(svc => svc.PriceStream(It.IsAny<string>())).Returns(priceStream);

    var sut = new MyPresenter(_myServiceMock.Object, _viewModelMock.Object, _schedulerService);
    sut.Show("SomeSymbol");

    _schedulerService.ThreadPool.RunTo(timeoutPeriod.Ticks - 1);
    Assert.IsTrue(_viewModelMock.Object.IsConnected);

    _schedulerService.ThreadPool.RunTo(timeoutPeriod.Ticks);
    Assert.IsFalse(_viewModelMock.Object.IsConnected);
}
The key points to note are:
  1. We return an Observable.Never for our price stream so that no prices are ever pushed and no OnComplete is published either.
  2. The _schedulerService is a test fake that returns TestSchedulers for all of it’s schedulers
  3. We run the ThreadPool TestScheduler up until 1 tick away from our timeout period and ensure that we have not timed out
  4. We run the ThreadPool TestScheduler up to our timeout period and then ensure that we have timed out.
  5. The test is sub second even though we are testing for a 10 second timeout!
Generally I only want to have one assertion in each of my tests, but for this example I think it elegantly tests that the Timeout is for 10seconds and not longer or shorter. If I was to remove the first assertion my test would only prove that the timeout was no greater than 10 seconds but could reasonably be set to say 3 seconds. The implementation for this simple presenter is as follows
public class MyPresenter
{
    private readonly IMyService _myService;
    private readonly IViewModel _viewModel;
    private readonly ISchedulerService _schedulerService;

    public MyPresenter(IMyService myService, IViewModel viewModel, ISchedulerService schedulerService)
    {
        _myService = myService;
        _schedulerService = schedulerService;
        _viewModel = viewModel;
    }

    public void Show(string symbol)
    {
        _myService.PriceStream(symbol)
                    .SubscribeOn(_schedulerService.ThreadPool)
                    .ObserveOn(_schedulerService.Dispatcher)
                    .Timeout(TimeSpan.FromSeconds(10), _schedulerService.ThreadPool)
                    .Subscribe(OnPriceUpdate, ex =>
                                                    {
                                                        if (ex is TimeoutException)
                                                            _viewModel.IsConnected = false;
                                                    });
        _viewModel.IsConnected = true;
    }

    private void OnPriceUpdate(decimal price)
    {
        _viewModel.Prices.Add(price);
    }
}
I hope this post on testing helps you bring you skills that you have been developing in Rx to a level where you may be comfortable considering them for production use.
For your reference here are the two test versions of the ISchedulerService I find useful. One will just schedule everything with the ImmediateScheduler and the other uses the TestSchedulers for fine grained control.
public sealed class TestSchedulers : ISchedulerService
{
    private readonly TestScheduler _currentThread = new TestScheduler();
    private readonly TestScheduler _dispatcher = new TestScheduler();
    private readonly TestScheduler _immediate = new TestScheduler();
    private readonly TestScheduler _newThread = new TestScheduler();
    private readonly TestScheduler _threadPool = new TestScheduler();

    #region Implementation of ISchedulerService
    IScheduler ISchedulerService.CurrentThread { get { return _currentThread; } }

    IScheduler ISchedulerService.Dispatcher { get { return _dispatcher; } }

    IScheduler ISchedulerService.Immediate { get { return _immediate; } }

    IScheduler ISchedulerService.NewThread { get { return _newThread; } }

    IScheduler ISchedulerService.ThreadPool { get { return _threadPool; } }
    #endregion

    public TestScheduler CurrentThread { get { return _currentThread; } }

    public TestScheduler Dispatcher { get { return _dispatcher; } }

    public TestScheduler Immediate { get { return _immediate; } }

    public TestScheduler NewThread { get { return _newThread; } }

    public TestScheduler ThreadPool { get { return _threadPool; } }
}

public sealed class ImmediateSchedulers : ISchedulerService
{
    public IScheduler CurrentThread { get { return Scheduler.Immediate; } }

    public IScheduler Dispatcher { get { return Scheduler.Immediate; } }

    public IScheduler Immediate { get { return Scheduler.Immediate; } }

    public IScheduler NewThread { get { return Scheduler.Immediate; } }

    public IScheduler ThreadPool { get { return Scheduler.Immediate; } }
}
The full source code is now available either via svn at http://code.google.com/p/rx-samples/source/checkout or as a zip file.
Back to the contents page for Reactive Extensions for .NET Introduction
Back to the previous post; Rx Part 7 – Hot and Cold Observables
Forward to next post; Part 9 – Join, Window, Buffer and Group Join
Technorati Tags: ,,

Sunday, June 27, 2010

Rx Part 6 – Scheduling and Threading

STOP THE PRESS! This series has now been superseded by the online book www.IntroToRx.com. The new site/book offers far better explanations, samples and depth of content. I hope you enjoy!

So far in the series of posts we have managed to avoid any explicit usage of threading or concurrency. There are some methods that we have covered that implicitly will be introducing some level of concurrency to perform their jobs (e.g. : Buffer, Delay, Sample etc all require a separate thread to do their magic). However most of this has been kindly abstracted away from us. This post will look at the beauty of the Rx API and its ability to effectively remove the need for WaitHandles, and any explicit calls to using Threads, the ThreadPool and the new shiny Task type.
A friend of mine once wisely stated that you should always understand at least one layer below what you are coding. At the time he was referring to networking protocols, but I think it is sage advice for all programming. On the current project I am working on there are some very savvy developers that are very comfortable working in a multithreaded environment. The project has client and server side threading problems that we have had to tackle. I believe the whole team would agree that it has bee amazing that amount of concurrency that Rx will handle for you in a declarative way. The code base is virtually free of WaitHandles, Monitor or lock usage, or any explicit creation of threads. This has evolved into this state over time as we have come to grips with the power of Rx and the end result is far cleaner code. However, having the experience on the team allowed us to find out ways we should and shouldn’t be using Rx which would have been just too hard for me to do alone.
Getting back to my friend’s comment about understanding the underlying subsystem, this is especially important when dealing with Rx and scheduling. Just because Rx abstracts some of this away, it does not mean that you cant still create problems for yourself if you are not careful. Before I scare you too much let’s look at some of the Scheduling features of Rx.

Scheduling

In the Rx world, you can control the scheduling of two things
  1. The invocation of the subscription
  2. The publishing of notifications
As you could probably guess these are exposed via two extension methods to IObservable<T> called SubscribeOn and ObserveOn. Both methods have an overload that take an IScheduler and will return an IObservable<T> so you can chain methods together.
public static class Observable
{
  public static IObservable<TSource> ObserveOn<TSource>(
      this IObservable<TSource> source, IScheduler scheduler) 
  {...}
public static IObservable<TSource> SubscribeOn<TSource>(
      this IObservable<TSource> source, IScheduler scheduler) 
  {...}
}

public interface IScheduler
{
    IDisposable Schedule(Action action);
    IDisposable Schedule(Action action, TimeSpan dueTime);
    DateTimeOffset Now { get; }
}
The IScheduler interface is of less interest to me than the types that implement the interface. Depending on your platform* (Silverlight3, Silverlight4, .Net 3.5, .Net 4.0) you will be exposed appropriate implementations via a static class Scheduler. These are the static properties that you can find on the Scheduler type that expose different schedulers.
Scheduler.Dispatcher will ensure that the actions are performed on the Dispatcher, which is obviously useful for Silverlight and WPF applications. You can imagine that the implementation for this would just delegate any calls to ISchedule(Action) straight to Dispatcher.BeginInvoke(Action)
Scheduler.NewThread will schedule all actions onto a new thread.
Scheduler.ThreadPool will schedule all actions onto the Thread Pool.
Scheduler.TaskPool (which is only available to Silverlight 4 and .NET 4.0) will schedule actions onto the TaskPool.
Scheduler.Immediate will ensure the action is not scheduled but is executed immediately.
Scheduler.CurrentThread just ensures that the actions are performed on the thread that made the original call. This is different to Immediate, as CurrentThread will queue the action to be performed. Note the difference in the output of the following code. One method passes Scheduler.Immediate, the other passes Scheduler.CurrentThread.
private static void ScheduleTasks(IScheduler scheduler)
{
    Action leafAction = () => Console.WriteLine("leafAction.");
    Action innerAction = () =>
                             {
                                 Console.WriteLine("innerAction start.");
                                 scheduler.Schedule(leafAction);
                                 Console.WriteLine("innerAction end.");
                             };
    Action outerAction = () =>
                             {
                                 Console.WriteLine("outer start.");
                                 scheduler.Schedule(innerAction);
                                 Console.WriteLine("outer end.");
                             };
    scheduler.Schedule(outerAction);
}

public void CurrentThreadExample()
{
    ScheduleTasks(Scheduler.CurrentThread);
    Console.ReadLine();
    /*Output:
     * outer start.
     * outer end.
     * innerAction start.
     * innerAction end.
     * leafAction.
     */
}

public void ImmediateExample()
{
    ScheduleTasks(Scheduler.Immediate);
    Console.ReadLine();
    /*Output:
     * outer start.
     * innerAction start.
     * leafAction.
     * innerAction end.
     * outer end.
     */
}
*Sorry Rx for JavaScript, I have not even opened the box on you and don’t know anything about scheduling in JavaScript.
Examples
So they are each of our Schedulers, lets see some of them in use. The think I want to point out here is that the first few times I used these overloads I had them confused as to what they actually did. You should use the SubscribeOn method to describe how you want any warm up and background processing code to be scheduled. ObserveOn method is used to describe where you want your notification scheduled to. So for example, if you had a WPF application that used Rx to populate and ObservableCollection<T> then you would almost certainly want to use SubscribeOn with one of the Threaded schedulers (NewThread, ThreadPool or maybe TaskPool) and then you would have to use the Dispatcher scheduler to update your collection.
public void LoadCustomers()
{
    _customerService.GetCustomers()
        .SubscribeOn(Scheduler.NewThread)
        .ObserveOn(Scheduler.Dispatcher)
        .Subscribe(Customers.Add);
}
So all of the schedulers just offer a nice abstraction to us to utilise the various ways we can write concurrent code. Besides saving me from having to write the tedious code to get code onto a new thread or thread pool it also makes Rx threading easy. Oh Rx, you thought I had forgotten. I didn’t think that any of the schedulers except Current & Immediate warranted a further explanation but, I do think it is worth pointing out some of the “fun” threading problems you can face even though the scheduling has been abstracted away from you.

Deadlocks

When writing the current application my team is working on we found out the hard way that Rx code can most certainly deadlock. When you consider that some calls (like .First() ) are blocking, and that we can schedule work to be done in the future, it becomes obvious that race condition can apply. This example is the most simple deadlock I could think of. It is fairly silly but it will get the ball rolling.
var stream = new Subject<int>();
Console.WriteLine("Next line should deadlock the system.");
var value = stream.First();
stream.OnNext(1);
Console.WriteLine("I can never execute....");
Hopefully we wont ever write code that silly, and if we did our tests would give us fairly quick feed back that things were wrong. What lets deadlocks slip into the system is when they manifest themselves at integration points. This example may be a little harder to find but is only small step away from the silly 1st example. Here we block in the constructor on a UI element which will always be created on the dispatcher. The blocking call is waiting for an event, that can only be raised from the dispatcher – deadlock.
public Window1()
{
    InitializeComponent();
    DataContext = this;
    Value = "Default value";

    //Deadlock! We need the dispatcher to continue
    // to allow me to click the button to produce a value.
    Value = _subject.First(); 

    //This will give same result but will not be blocking(deadlocking).
    _subject.Take(1).Subscribe(value => Value = value);
}

private void MyButton_Click(object sender, RoutedEventArgs e)
{
    _subject.OnNext("New Value");
}

public string Value
{
    get { return _value; }
    set
    {
        _value = value;
        var handler = PropertyChanged;
        if (handler != null) handler(this, new PropertyChangedEventArgs("Value"));
    }
}
In this example we start seeing things that can become more sinister. This example has a Button that the click command will try to get the first value from an Observable exposed via an interface.
public partial class Window1 : INotifyPropertyChanged
{
    private readonly IMyService _service = new MyService(); //Imagine DI here.
    private int _value2;

    public Window1()
    {
        InitializeComponent();
        DataContext = this;
    }

    public int Value2
    {
        get { return _value2; }
        set
        {
            _value2 = value;
            var handler = PropertyChanged;
            if (handler != null) handler(this, new PropertyChangedEventArgs("Value2"));
        }
    }

    #region INotifyPropertyChanged Members

    public event PropertyChangedEventHandler PropertyChanged;

    #endregion

    private void MyButton2_Click(object sender, RoutedEventArgs e)
    {
        Value2 = _service.GetTemperature().First();
    }
}
There is only a small problem here in that we block on the Dispatcher thread (.First() is a blocking call), however this manifest's itself into a deadlock if the service code is written incorrectly.
class MyService : IMyService
{
    public IObservable<int> GetTemperature()
    {
        return Observable.Create<int>(
            o =>
                {
                    o.OnNext(27);
                    o.OnNext(26);
                    o.OnNext(24);
                    return () => { };
                })
            .SubscribeOnDispatcher();
    }
}
This odd implementation with explicit scheduling will cause the 3 OnNext calls to be scheduled once the .First() call has finished, which is waiting for an OnNext to be called – Deadlock.
So far this post has been a bit doom and gloom about scheduling and the problems you could face, that is not the intent. I just wanted to make it obvious that Rx was not going to solve the age old concurrency problems, but it will make it easier to get it right if you follow this simple rule.
  1. Only the final subscriber should be setting the scheduling.
  2. Avoid using .First() –Ed: that is for you Olivier. We will cal this rule 1b
Where the last example came unstuck is that the service was dictating the scheduling paradigm when really it had no business doing so. Before we had a clear idea of where we should be doing the scheduling in my current project, we had allsorts of layers adding “helpful” scheduling code. What it ended up creating was a threading nightmare. When we removed all scheduling code and then located it in a single layer (at least in the Silverlight client) most of our concurrency problems went away. I recommend you do the same. At least in WPF/Silverlight applications, the pattern should be simple: “Subscribe on a Background thread; Observe on the Dispatcher”.
So my challenge to the readers is to add to the comments:
  1. Any other scheduling rules (2 seems quite small, and I was only going to have 1)
  2. Post some nasty Rx race condition code
  3. What rules do you have for Subscribing on the background thread? Which Scheduler should I use and when i.e. NewThread, ThreadPool & TaskPool. – and I come full circle about understanding one layer below that to which you are working.
Further reading/watching:
  1. This channel9 video has more interesting stuff including testing with schedulers http://channel9.msdn.com/shows/Going+Deep/Wes-Dyer-and-Jeffrey-Van-Gogh-Inside-Rx-Virtual-Time/
The full source code is now available either via svn at http://code.google.com/p/rx-samples/source/checkout or as a zip file.
Back to the contents page for Reactive Extensions for .NET Introduction
Back to the previous post; Part 5 - Combining multiple IObservable streams
Forward to next post; Part 7 - Hot and Cold observables
Technorati Tags: ,,

Thursday, July 9, 2009

.NET Parallel Framework - Videos

Way back in June 2008 Joe Albahari gave a presentation on the upcoming parallel programming features in .NET 4.0. I have finally published the recording of his session here. Just for reference the Parallel Framework encompasses PLINQ and is sometimes referred to as the TPL (Task Parallel Library) or System.Threading.dll

Sorry about the delay in the post.

Joe Albarhari Parallel FX and PLINQ videos : 6 videos @ ~10min and 40-50MB each.

Saturday, June 6, 2009

Responsive WPF User Interfaces Part 7

Creating a responsive Image control

In part 6 we discovered problems even when we follow the guidelines from this series. In this case we find that sometimes it can be the controls themselves that are the cause of the lagging interface. In part 6 it was the Image control that was to blame. I make the assumption that it was trying to perform it's bitmap decoding on my precious dispatcher thread. However not only Image controls can get ugly, Charles Petzold shows some problems you may find when using chart controls (or any Items Control) in his Writing More Efficient Items Controls article.

The first thing I wanted to do was to just sub class Image however, I personally was stumped as to how I would then create my control template for it. Next I actually only wanted to accept URIs as my source so that I can do the decoding from file to an ImageSource myself explicitly and not on the UI thread via a TypeConverter. So I want a sub class of Control with a dependency property of UriSource and then 3 read-only properties ImageSource, IsLoading and HasLoadFailed. UriSource will provide the hook to bind your file name to. ImageSource will then provide the decoded ImageSource to be displayed. IsLoading and HasLoadFailed will be there so that you can update the UI appropriate to the lifecycle of the image.

The Style and control template I came up for this design was this:

<Style TargetType="{x:Type controls:Thumbnail}">
  <Setter Property="Template">
    <Setter.Value>
      <ControlTemplate TargetType="{x:Type controls:Thumbnail}">
        <Image x:Name="ImageThumbnail"
               Source="{TemplateBinding Image}"
               HorizontalAlignment="{TemplateBinding HorizontalAlignment}"
               VerticalAlignment="{TemplateBinding VerticalAlignment}"
               MaxHeight="{TemplateBinding MaxHeight}"
               MaxWidth="{TemplateBinding MaxWidth}"
               Stretch="Uniform"
               StretchDirection="DownOnly" />
      </ControlTemplate>
    </Setter.Value>
  </Setter>
</Style>

Where I want to use the Thumbnail control I can have some XAML that hides and shows a loading indicator. This example here just shows the text "Loading Image..." but would probably have a nice animation or an indeterminate progress indicator.

<Border CornerRadius="4" BorderBrush="Silver" BorderThickness="1"
        Width="150"
        Height="150"
        Margin="10">
  <Grid>
    <local:Thumbnail x:Name="Thumbnail"
                     MaxWidth="148"
                     MaxHeight="148"
                     UriSource="{Binding}" 
                     HorizontalAlignment="Center" VerticalAlignment="Center"
                     ToolTip="{Binding}">
      <local:Thumbnail.Style>
        <Style TargetType="{x:Type local:Thumbnail}">
          <Setter Property="Visibility" Value="Visible"/>
          <Style.Triggers>
            <DataTrigger Binding="{Binding RelativeSource={RelativeSource Self}, Path=IsLoading}" Value="True">
              <Setter Property="Visibility" Value="Collapsed"/>
            </DataTrigger>
          </Style.Triggers>
        </Style>
      </local:Thumbnail.Style>
    </local:Thumbnail>

    <TextBlock Text="Loading image..."
               Foreground="Gray"
               HorizontalAlignment="Center"
               VerticalAlignment="Center">
      <TextBlock.Style>
          <Style TargetType="TextBlock">
              <Setter Property="Visibility" Value="Visible"/>
              <Style.Triggers>
                  <DataTrigger Binding="{Binding ElementName=Thumbnail, Path=IsLoading}" Value="False">
                      <Setter Property="Visibility" Value="Collapsed"/>
                  </DataTrigger>
              </Style.Triggers>    
          </Style>
      </TextBlock.Style>
    </TextBlock>
  </Grid>
</Border>

Well that is the easy bit, the public API. Trust me it gets more interesting.

My gut feeling was basically take the code from reflector and use that to decode Uris to ImageSource objects, but perform the action on a background thread. Two problems here:

  1. Most of the fun code that happens when the URI is being parsed and then decoded, is internal. :-(
  2. You cant pass most sub-classes of ImageSource across threads. If you create them on one thread they cant be accessed on another thread. So this stops us blindly copying code from reflector as all that code only runs on the dispatcher thread so wont face this problem.

We do have something to work with however: WriteableBitmap.

In some vain attempt at brevity (he says in his 7th post in the series!), I will try to skip over all of the brick walls I faced and jump straight to the solution I came up with. This was a great learning experience for me, and in the spirit of a learning experience the code is fairly rough (with TODO comments still intact). I will try to build this control into a stable control but in its current state is very much demo-ware.

First thing I want to achieve was to have the decoding and if possible the reading from disk happen off the UI thread. Lets start with the easy bit; reading the file into memory. I'm going to keep that simple and just go with grabbing the file as a byte array like this

byte[] buffer = File.ReadAllBytes(UriSource);

Next I want to decode the byte array into some form of ImageSource. To do this I have used a combination of the BitmapDecoder and the WriteableBitmap. First I take the byte array and load it into a MemoryStream, and then pass the stream to the BitmapDecoder factory method Create. This will return me an instance of one of its implementations (BitmapDecoder is abstract/MustInherit). From here I make a bold assumption that we only care about the first "Frame" of the image. I believe that most formats don't support multiple frames but formats like GIF do which allows them to have animation features. Anyway, in my demo-ware code I just take the first frame.

using (Stream mem = new MemoryStream(buffer))
{
  BitmapDecoder imgDecoder = null;
  imgDecoder = BitmapDecoder.Create(mem, BitmapCreateOptions.None, BitmapCacheOption.None);

  BitmapFrame frame = imgDecoder.Frames[0];
  double scale = GetTransormScale(maxWidth, maxHeight, frame.PixelWidth, frame.PixelHeight);

  BitmapSource thumbnail = ScaleBitmap(frame, scale);

  // this will disconnect the stream from the image completely ...
  var writable = new WriteableBitmap(thumbnail);
  writable.Freeze();
  return writable;
}

From here I figure out the ratio that I want to scale it to. There doesn't seem much point in returning an 8MB image if we only want to see it as 300x300 does it? Next we request the image as what is almost our final product. We have a helper method scale the frame and return it as a BitmapSource. We can't assign this BitmapSource back to our ImageSource dependency property as they don't play nice over thread boundaries. So, the last thing we need to do is take the BitmapSource we just generated and create a WriteableBitmap from it and then call its Freeze method. This puts the WriteableBitmap in an immutable state which then makes it thread safe. Whew!

Just for reference here is the GetTransformScale method

private static double GetTransormScale(double maxWidth, double maxHeight, double currentWidth, double currentHeight)
{
  double xRatio = maxWidth / currentWidth;
  double yRatio = maxHeight / currentHeight;
  double resizeRatio = (xRatio > yRatio) ? xRatio : yRatio;
  if (resizeRatio > 1)
    resizeRatio = 1;
  return resizeRatio;
}

and the ScaleBitmap method

private static BitmapSource ScaleBitmap(BitmapSource source, double scale)
{
  if (scale > 0.9999 && scale < 1.0001)
  {
    return source;
  }
  var thumbnail = new TransformedBitmap();
  thumbnail.BeginInit();
  thumbnail.Source = source;
  var transformGroup = new TransformGroup();
  transformGroup.Children.Add(new ScaleTransform(scale, scale));
  thumbnail.Transform = transformGroup;
  thumbnail.EndInit();
  return thumbnail;
}

So all things considered, once you get over the decoding stuff and then wrestle with the various subclasses of ImageSource that play their part, its not too bad. But like I said earlier; it gets more interesting. So far we have only looked at how to decode the image, we have yet to consider how to make the call to perform the decoding. My first instinct was to make the call on any change to the UriSource property. However I may not have the MaxHeight and MaxWidth information at that point in time. This caused me much stress over when should I call this decode functionality. If no value is ever going to be set for MaxHeight or MaxWidth then I should just process the image, but if first the UriSource is set then the MaxHeight, then the MaxWidth I would end up creating 3 asynchronous calls to render 3 different sized images. This would be a disaster as it would surely end up with race conditions and most likely the wrong sized image being displayed. The other obvious problem with that is that we would be performing 3 times the work. Hmm.

My solution (and mileage may vary as I am green to concurrent programming models) was to create a stack of render requests for each instance of a Thumbnail. As a property was set then a request would be added to the stack and a request to start processing the stack would occur. Periodically while processing the image I would check to see if the current work was invalidated by any new requests to the stack. If the current request was invalid it would terminate its work. The request to start processing the stack would simply try to pop the last request from the stack and clear out all other requests (effectively ignoring stale requests). On returning from the render request it would loop back and try to pop anything new from the stack. This last part while important is very much implementation details and could vary dramatically from anything you may implement. I have just read over the code myself and I could do with some work. It is amazing what just 3months (and reading Joe Duffy's Concurrent Programming for Windows) does for your appreciation of your code.

As always the code is available for you to have a play. Open it up, pick it to pieces, use what you like. Obviously I take no responsibility for the code if you do choose to use it as this is intended on being a learning exercise. Having said that I do try to produce good code for my demos so if you do see something that is not good enough let me know.

This has been a fun series and I hope you liked it and learnt as much as I did from it.

Back to series Table Of Contents

Working version of the code can be found here

Tuesday, May 26, 2009

Responsive WPF User Interfaces Part 6

Unresponsive Controls

Sorry about the unreasonable delay between this post and the last post in this series. Interestingly readers that have been following the series have already jumped ahead to see that not all is fine even if you follow the guidance provided. 'Arne' makes a comment on the last post that he is having some problems even when he follows the guidance especially when loading a lot of images. Some of the team I work with are currently working with graphing/charting products that are great with tens and hundreds of rows of data but create an unresponsive UI when pushed to use thousands of rows of data (eg +5 years of daily stock info).

So if we are following the rules what can we do? Well let us look at a concrete problem first and for consistency let's stay with the PhotoAlbum project. For a quick refresher, we have a "ViewModel" with a property Images that is of type ObservableCollection<Uri>. The XAML snippet that displays the Images looks like this:

<ListBox ItemsSource="{Binding Images}"
         ScrollViewer.HorizontalScrollBarVisibility="Disabled">
  <ListBox.ItemTemplate>
    <DataTemplate>
      <Border Background="AliceBlue"
              CornerRadius="2"
              Width="150"
              Height="150">
        <Image Source="{Binding}"
               MaxHeight="148"
               MaxWidth="148"
               Stretch="Uniform"
               StretchDirection="DownOnly"
               HorizontalAlignment="Center"
               VerticalAlignment="Center"
               ToolTip="{Binding}" />
      </Border>
    </DataTemplate>
  </ListBox.ItemTemplate>
  <ListBox.ItemsPanel>
    <ItemsPanelTemplate>
      <WrapPanel IsItemsHost="True" />
    </ItemsPanelTemplate>
  </ListBox.ItemsPanel>
</ListBox>

Now in theory there is nothing wrong with this XAML. From a declarative programming point of view, I think it is well written (Ed: Cause I wrote it!) as it describes what we want (Items in the ListBox to be wrapped horizontally, displayed as Images within a border.

The problem with this declarative code is what most people fear with declarative code: what is actually happening under the hood? Before we trek too far, if I run the code (see example 6_UnresponsiveImages in the code example) I can select folders with small amount of small images just fine. The application runs ok. The current code becomes a problem when I point it to folders with large images. This is compounded when there are lots of those large images or when I am running on a slower/older computer.

We will quickly go off track to consider the likelihood of the large image slow computer problem. Digital cameras currently are getting cheaper and the quality is going up. Mid range cameras range between 8-12 megapixel and can have in excess of 8GB of memory.  Phones now are coming out with 5-8 megapixel cameras. If you come back and read this 12months from now, I guess you will laugh at the small sizes I refer to. Next consider the average user's computer. Rightly or wrongly, the release of vista saw very few new features that users felt they needed. Many people still run Win XP and do so on old hardware. Pentium 4 chips are still pervasive in many homes and offices. Loading a gig of 10 megapixel images in our current app does prove to be a performance problem.

We actually have 2 problems here:

  1. loading of the image in it's full resolution
  2. loading the image on the UI thread

We will only discuss issue 2 because technically this series is about responsive UIs, not performance (similar but not the same problem). So to get to the bottom of why our UI is laggy even though we have

  • loaded our Images on a different thread,
  • updated the UI using the dispatcher
  • and written nice XAML

we should understand a little bit about the Image control. The Image control has a Source property. Most often this source property is given a string or Uri, however some may have noticed that it actually is of type ImageSource. Through the magic of TypeConverters our strings and URI are converted to an appropriate sub class of ImageSource, most likely BitmapFrame. From having a quick browse over the code implemented around the ImageSource, BitmapSource, BitmapFrame & BitmapDecoder, I can only deduct that the only code executed off the UI thread is the downloading of the image where the source is a URI with http or https protocol. One may then argue that "well if it came from the file system wouldn't that be so fast that it could be done on the UI thread". One may argue that, but that is not the whole argument. Once the file has been read from disk it still must be decoded and then resized. While this generally is fast and would normally take less than 1 second, we should remember back to some magic number I made up that was 250ms-330ms (1/4 to 1/3 of a second) is the max the UI thread can hang for before it is very clear to the user. Now if I load just 8 images that each take 330ms-500ms to load from disk, decode and then resize this will create an awful user experience for the ender user as the progress bar stutters and images appear and the mouse is jerky.

To reproduce the problems discussed in this post you will want to get some hi-res images and load up the example code that can be found here. Try out the 6th example and point the source folder of the pop up widow to your folder with the hi-res images.

Next post we will look at the issues we will face with solving the problem of Images that kill the responsiveness of our UI. We will discuss fun things like decoders, freezables and maybe the parallel extensions that will become part of .NET 4.0

Previous - Responsive WPF User Interfaces Part 5 - Testing multi-threaded WPF code

Next - Responsive WPF User Interfaces Part 7 - Responsive Controls

Back to series Table Of Contents

Working version of the code can be found here

Monday, February 16, 2009

Responsive WPF User Interfaces Part 5

Testing multi-threaded WPF code

Stop press: Dont use this method. Read the article, but follow comment at bottom of post (ie Use Rx instead)

In the last post in this series we took a rather long way to get to the multi-threaded result we were looking for. This was because we decided to separate out our code in cohesive parts that allowed for more maintainable code. The popular method of creating maintainable code currently is through Unit Testing. An even better approach would be to apply Test Driven Development. TDD is a style of design where tests outlining our goals are written first and then code to satisfy those tests is created. Having identified the technical challenges of keeping a WPF application responsive, namely; the concepts related to the Dispatcher and parallel programming, we can now step back again to see the bigger picture as we did in part 4, to move forward.

In this post we will drive out our presentation model through tests and discover the issues related to testing WPF code and in particular testing the multi-threaded code. Just to set expectations, there is an assumption here that the reader is familiar with WPF Data Templates and unit testing with a mocking framework.

From my experience with unit testing it is always good to start off with a set of requirements that we could turn into tests. Continuing with our example of a thumbnail viewer, lets create a list of our requirements:

  • User can choose a folder
  • Can see what folder was selected
  • Will list all images in that directory and sub directories
  • Will indicate when it is processing
  • Cannot set folder while processing
  • The user interface will remain responsive during processing

For brevity, I will try to cheat as much as I can so more time can be spent on the technical issues of testing multi-threaded WPF code and less time spouting TDD goodness. I will first cheat by making the assumption that this is WPF code so will need implement constructs such as ICommand and INotifyPropertyChanged.

From these requirements I eventually came to the following test cases:

[TestClass]
class PhotoAlbumModelFixture
{
    [TestMethod]
    public void SetSourceCommand_sets_SourcePath(){}
    
    [TestMethod]
    public void SetSourceCommand_calls_FileService_with_value_from_FolderSelector(){}

    [TestMethod] 
    public void SetSourceCommand_calls_FileService_with_an_ImageOnly_filter() {}

    [TestMethod]
    public void SetSourceCommand_populates_images_from_FileService(){}

    [TestMethod]
    public void SetSourceCommand_recursively_calls_FileService(){}

    [TestMethod]
    public void SetSourceCommand_does_not_call_FileService_with_empty_value(){}

    [TestMethod]
    public void SetSourceCommand_sets_IsLoading_to_True(){}

    [TestMethod]
    public void SetSourceCommand_is_disabled_when_IsLoading(){}

    [TestMethod]
    public void FileService_is_called_Async(){}
}

When writing some of the tests I found that standard unit test code was fine. When I started to implement my code that had to make multithreaded calls, however, testing became problematic.

For example, my first attempt to write the "SetSourceCommand_calls_FileService_with_value_from_FolderSelector" test looked like this:

[TestMethod]
public void SetSourceCommand_calls_FileService_with_value_from_FolderSelector()
{
    Rhino.Mocks.MockRepository mockery = new Rhino.Mocks.MockRepository();
    ArtemisWest.Demo.ResponsiveUI._4_MultiThreaded.IFileService fileService = mockery.DynamicMock<ArtemisWest.Demo.ResponsiveUI._4_MultiThreaded.IFileService>();
    ArtemisWest.Demo.ResponsiveUI._5_MultiThreadedTest.IFolderSelector folderSelector = mockery.DynamicMock<ArtemisWest.Demo.ResponsiveUI._5_MultiThreadedTest.IFolderSelector>();

    PhotoAlbumModel model = new PhotoAlbumModel(Dispatcher.CurrentDispatcher, fileService, folderSelector);

    using (mockery.Record())
    {
        Expect.Call(folderSelector.SelectFolder()).Return(FolderPath);
        Expect.Call(fileService.ListFiles(FolderPath, null)).Return(EmptyList).IgnoreArguments().Constraints(
          Rhino.Mocks.Constraints.Is.Equal(FolderPath),
          Rhino.Mocks.Constraints.Is.Anything());
        Expect.Call(fileService.ListDirectories(FolderPath)).Return(EmptyList);
    }

    using (mockery.Playback())
    {
        model.SetSourcePathCommand.Execute(null);
    }
}

And following TDD rules of just write enough code to satisfy the test, my implementation of the Execute command handler looks like this:

void ExecuteSetSourcePath(object sender, ExecutedEventArgs e)
{
    SourcePath = this.folderSelector.SelectFolder();
    IsLoading = true;
    LoadPath(SourcePath);
    IsLoading = false;
}

void LoadPath(string path)
{
    IEnumerable<string> files = fileService.ListFiles(path, IsImage);
    foreach (string item in files)
    {
        Images.Add(item);
    }

    IEnumerable<string> directories = fileService.ListDirectories(path);
    foreach (string item in directories)
    {
        LoadPath(item);
    }
}

Astute readers will notice the complete lack of "Responsive UI Code". Well I have yet to reach my test that specifies that the call to FileService should be asynchronous. So after I have finished writing all of my other tests and the code to support them, I write some test code to enforce the responsive requirement:

[TestMethod]
public void FileService_is_called_Async()
{
    SlowFileServiceFake fileService = new SlowFileServiceFake();
    Rhino.Mocks.MockRepository mockery = new Rhino.Mocks.MockRepository();
    ArtemisWest.Demo.ResponsiveUI._5_MultiThreadedTest.IFolderSelector folderSelector = mockery.DynamicMock<ArtemisWest.Demo.ResponsiveUI._5_MultiThreadedTest.IFolderSelector>();

    PhotoAlbumModel model = new PhotoAlbumModel(Dispatcher.CurrentDispatcher, fileService, folderSelector);

    using (mockery.Record())
    {
        Expect.Call(folderSelector.SelectFolder()).Return(FolderPath);
    }

    using (mockery.Playback())
    {
        model.SetSourcePathCommand.Execute(null);
        //Due to the sleeps in the stub this should only have 1 item at this stage.
        Assert.IsTrue(model.Images.Count < fileService.ExpectedFiles.Count);
    }
    Thread.Sleep(300);
    CollectionAssert.AreEquivalent(fileService.ExpectedFiles, model.Images);
}

private class SlowFileServiceFake : ArtemisWest.Demo.ResponsiveUI._4_MultiThreaded.IFileService
{
    public readonly List<string> ExpectedFiles = new List<string>() { "value0", "value1", "value2", "value3", "value4", "value5" };

    public IEnumerable<string> ListFiles(string path, Predicate<string> filter)
    {
        foreach (var item in ExpectedFiles)
        {
            yield return item;
            Thread.Sleep(30);
        }
    }

    public IEnumerable<string> ListDirectories(string path)
    {
        return EmptyList;
    }
}

Here I have used a Fake to provide canned results with a hard coded delay. In theory this should drip feed values to the presentation model.

I now go back to update my model to get the tests to pass. Following my own advice I change the code to look like the following:

void ExecuteSetSourcePath(object sender, ExecutedEventArgs e)
{
    string folder = this.folderSelector.SelectFolder();
    if (!string.IsNullOrEmpty(folder))
    {
        SourcePath = folder;
        StartLoadingFiles(SourcePath);
    }
}

void StartLoadingFiles(string path)
{
    BackgroundWorker fileWorker = new BackgroundWorker();
    fileWorker.DoWork += (sender, e) =>
    {
        LoadPath(path);
    };
    fileWorker.RunWorkerCompleted += (sender, e) =>
    {
        IsLoading = false;
    };
    fileWorker.RunWorkerAsync();
}

void LoadPath(string path)
{
    IEnumerable<string> files = fileService.ListFiles(path, IsImage);
    foreach (string item in files)
    {
        dispatcher.Invoke(new Action(() => { Images.Add(item); }));
    }

    IEnumerable<string> directories = fileService.ListDirectories(path);
    foreach (string item in directories)
    {
        LoadPath(item);
    }
}

To my surprise this code does not satisfy the test! The reason is because the Dispatcher is not in an Executing loop. This would normally be started by WPF when the application starts, but here we are just in test code. The solution lies with the DispatcherFrame. A dispatcher frame represents an execution loop in a Dispatcher. We can kick start this loop by simply instantiating a new DispatcherFrame and calling Dispatcher.PushFrame with it as the parameter. See Dan Crevier's blog for a really simple way to unit test in this fashion. If we implement Dan's method we end up with the following test code:

[TestMethod]
public void FileService_is_called_Async()
{
    SlowFileServiceFake fileService = new SlowFileServiceFake();
    Rhino.Mocks.MockRepository mockery = new Rhino.Mocks.MockRepository();
    ArtemisWest.Demo.ResponsiveUI._5_MultiThreadedTest.IFolderSelector folderSelector = mockery.DynamicMock<ArtemisWest.Demo.ResponsiveUI._5_MultiThreadedTest.IFolderSelector>();

    PhotoAlbumModel model = new PhotoAlbumModel(Dispatcher.CurrentDispatcher, fileService, folderSelector);

    using (mockery.Record())
    {
        Expect.Call(folderSelector.SelectFolder()).Return(FolderPath);
    }

    DispatcherFrame frame = new DispatcherFrame();
    model.PropertyChanged += (sender, e) => 
    {
        if (e.PropertyName == "IsLoading" && !model.IsLoading)
        {
            frame.Continue = false;
        }
    };

    using (mockery.Playback())
    {
        model.SetSourcePathCommand.Execute(null);
        //Due to the sleeps in the stub this should only have 1 item at this stage.
        Assert.IsTrue(model.Images.Count < fileService.ExpectedFiles.Count);
        Dispatcher.PushFrame(frame);
    }
    Thread.Sleep(300);
    CollectionAssert.AreEquivalent(fileService.ExpectedFiles, model.Images);
}

We could call it a day here, however I am not happy enough with this style of coding. My first problem is the explicit sleep I have in there. This makes my test slow. The fastest this test will ever run is 300ms. I could replace that with some sort of loop to check progress but then my test code is looking less like test code and more like low level code to dance-around dispatchers. This raises my other issue; the clutter I have added by adding the DispatcherFrame stuff.

My solution here was to create a construct that allowed me to code my intentions in a way that I thought to be clearer. I wanted to be able to

  • test code that would involve multi-threaded code and the dispatcher
  • specify what condition defined its completion
  • specify a timeout
  • treat the code block as a blocking call

The result I came up with is the following:

[TestMethod]
public void FileService_is_called_Async()
{
    Rhino.Mocks.MockRepository mockery = new Rhino.Mocks.MockRepository();
    SlowFileServiceFake fileService = new SlowFileServiceFake();
    ArtemisWest.Demo.ResponsiveUI._5_MultiThreadedTest.IFolderSelector folderSelector = mockery.DynamicMock<ArtemisWest.Demo.ResponsiveUI._5_MultiThreadedTest.IFolderSelector>();

    PhotoAlbumModel model = new PhotoAlbumModel(Dispatcher.CurrentDispatcher, fileService, folderSelector);
    using (mockery.Record())
    {
        Expect.Call(folderSelector.SelectFolder()).Return(FolderPath);
    }

    using (DispatcherTester dispatcherTester = new DispatcherTester(Dispatcher.CurrentDispatcher))
    {
        model.PropertyChanged += (sender, e) =>
        {
            if (e.PropertyName == "IsLoading" && !model.IsLoading)
                dispatcherTester.Complete();
        };
        dispatcherTester.Execute(() =>
          {
              model.SetSourcePathCommand.Execute(null);
              Assert.IsTrue(model.Images.Count < fileService.ExpectedFiles.Count);
          },
          new TimeSpan(0, 0, 2));
    }
    CollectionAssert.AreEquivalent(fileService.ExpectedFiles, model.Images);
}

This code describes a block of code that may require the use of the dispatcher, the condition where the asynchronous code is considered complete and a TimeSpan for a timeout. The test code is still not perfect but I think it is a step in the right direction.

The code for the DispatcherTester looks something like this:

internal sealed class DispatcherTester : IDisposable
{
  private readonly Dispatcher dispatcher;
  private readonly DispatcherFrame dispatcherFrame = new DispatcherFrame();

  public DispatcherTester(Dispatcher dispatcher)
  {
    this.dispatcher = dispatcher;
  }

  public Dispatcher Dispatcher
  {
    get { return dispatcher; }
  }

  public void Execute(Action action, TimeSpan timeout)
  {
    Execute(action, timeout, new TimeSpan(10));
  }

  public void Execute(Action action, TimeSpan timeout, TimeSpan wait)
  {
    Stopwatch stopwatch = Stopwatch.StartNew();
    action.Invoke();
    Dispatcher.PushFrame(dispatcherFrame);

    while (dispatcherFrame.Continue && stopwatch.Elapsed < timeout)
    {
      Thread.Sleep(wait);
    }
    if (stopwatch.Elapsed >= timeout)
    {
      dispatcherFrame.Continue = false;
      Dispatcher.DisableProcessing();
      Dispatcher.ExitAllFrames();
      throw new TimeoutException();
    }
  }

  public void Complete()
  {
    dispatcherFrame.Continue = false;
  }

  #region IDisposable Members

  public void Dispose()
  {
    dispatcherFrame.Continue = false;
  }

  #endregion
}

If any other developers have hit problems trying to write unit tests for their WPF code then I hope that this snippet of code helps. For those that are interested, the end result for the Model looks like

public class PhotoAlbumModel : INotifyPropertyChanged
{
  #region Fields
  private readonly Dispatcher dispatcher;
  private readonly _4_MultiThreaded.IFileService fileService;
  private readonly IFolderSelector folderSelector;
  private readonly DelegateCommand setSourcePathCommand;
  private readonly ObservableCollection<string> images = new ObservableCollection<string>();
  private string sourcePath;
  private bool isLoading = false;
  #endregion

  public PhotoAlbumModel(Dispatcher dispatcher, _4_MultiThreaded.IFileService fileService, IFolderSelector folderSelector)
  {
    this.dispatcher = dispatcher;
    this.fileService = fileService;
    this.folderSelector = folderSelector;
    setSourcePathCommand = new DelegateCommand(ExecuteSetSourcePath, CanSetSourcePath);
    this.PropertyChanged += (sender, e) => { if (e.PropertyName == "IsLoading") setSourcePathCommand.OnCanExecuteChanged(); };
  }

  public ObservableCollection<string> Images
  {
    get { return images; }
  }

  public bool IsLoading
  {
    get { return isLoading; }
    private set
    {
      isLoading = value;
      OnPropertyChanged("IsLoading");
    }
  }

  public string SourcePath
  {
    get { return sourcePath; }
    private set
    {
      sourcePath = value;
      OnPropertyChanged("SourcePath");
    }
  }

  public ICommand SetSourcePathCommand { get { return setSourcePathCommand; } }

  #region Command handlers
  void CanSetSourcePath(object sender, CanExecuteEventArgs e)
  {
    e.CanExecute = !IsLoading;
  }

  void ExecuteSetSourcePath(object sender, ExecutedEventArgs e)
  {
    string folder = this.folderSelector.SelectFolder();
    if (!string.IsNullOrEmpty(folder))
    {
      SourcePath = folder;
      StartLoadingFiles(SourcePath);
    }
  }
  #endregion

  #region Private method
  void StartLoadingFiles(string path)
  {
    IsLoading = true;
    BackgroundWorker fileWorker = new BackgroundWorker();
    fileWorker.DoWork += (sender, e) =>
    {
      LoadPath(path);
    };
    fileWorker.RunWorkerCompleted += (sender, e) =>
    {
      IsLoading = false;
    };
    fileWorker.RunWorkerAsync();
  }

  void LoadPath(string path)
  {
    IEnumerable<string> files = fileService.ListFiles(path, IsImage);
    foreach (string item in files)
    {
      dispatcher.Invoke(new Action(() => { Images.Add(item); }));
    }

    IEnumerable<string> directories = fileService.ListDirectories(path);
    foreach (string item in directories)
    {
      LoadPath(item);
    }
  }

  bool IsImage(string file)
  {
    string extension = file.ToLower().Substring(file.Length - 4);
    switch (extension)
    {
      case ".bmp":
      case ".gif":
      case ".jpg":
      case ".png":
        return true;
      default:
        return false;
    }
  }
  #endregion

  #region INotifyPropertyChanged Members
  public event PropertyChangedEventHandler PropertyChanged;

  protected void OnPropertyChanged(string propertyName)
  {
    PropertyChangedEventHandler handler = PropertyChanged;
    if (handler != null)
    {
      handler(this, new PropertyChangedEventArgs(propertyName));
    }
  }
  #endregion
}

Notice that the Folder dialogue code from the previous post has now been pushed out to an interface which cleans up the code and also allows us to test this model.

The data template looks almost identical to the previous post's window xaml:

<DataTemplate DataType="{x:Type local:PhotoAlbumModel}">
  <DataTemplate.Resources>
    <BooleanToVisibilityConverter x:Key="boolToVisConverter"/>
  </DataTemplate.Resources>
  <DockPanel>
    <DockPanel DockPanel.Dock="Top">
      <ProgressBar IsIndeterminate="True" Height="18" 
                   DockPanel.Dock="Top" 
                   Visibility="{Binding Path=IsLoading, 
                                Converter={StaticResource boolToVisConverter}}" />
      <Button x:Name="SetSourcePath" Command="{Binding Path=SetSourcePathCommand}" 
              DockPanel.Dock="Right">Set Source</Button>
      <Border BorderThickness="1" BorderBrush="LightBlue" Margin="3">
        <Grid>
          <TextBlock Text="{Binding SourcePath}">
            <TextBlock.Style>
              <Style TargetType="TextBlock">
                <Setter Property="Visibility" Value="Visible"/>
                <Style.Triggers>
                  <DataTrigger Binding="{Binding SourcePath}" Value="">
                    <Setter Property="Visibility" Value="Collapsed"/>
                    </DataTrigger>
                  <DataTrigger Binding="{Binding SourcePath}" Value="{x:Null}">
                    <Setter Property="Visibility" Value="Collapsed"/>
                  </DataTrigger>
                </Style.Triggers>
              </Style>
            </TextBlock.Style>
          </TextBlock>
          <TextBlock Text="Source not set" Foreground="LightGray" FontStyle="Italic">
            <TextBlock.Style>
              <Style TargetType="TextBlock">
                <Setter Property="Visibility" Value="Collapsed"/>
                <Style.Triggers>
                  <DataTrigger Binding="{Binding SourcePath}" Value="">
                    <Setter Property="Visibility" Value="Visible"/>
                    </DataTrigger>
                  <DataTrigger Binding="{Binding SourcePath}" Value="{x:Null}">
                    <Setter Property="Visibility" Value="Visible"/>
                  </DataTrigger>
                </Style.Triggers>
              </Style>
            </TextBlock.Style>
          </TextBlock>
        </Grid>
      </Border>
    </DockPanel>
    <ListView ItemsSource="{Binding Images}" 
              ScrollViewer.VerticalScrollBarVisibility="Visible" />
  </DockPanel>
</DataTemplate>

I hope that the examples here

  • give some insight on how you too can unit test your code,
  • show why a model is a better option for your WPF applications as you can test them
  • give you the courage to write multi threaded code in your WPF models in the knowledge that you can test it

Next we discover that sometimes controls can cause an unresponsive UI in Part 6.

Previous - Responsive WPF User Interfaces Part 4 - Multi-threaded Programming in WPF.

Back to series Table Of Contents

Working version of the code can be found here